
Extend the Data Model
Introduction
Data Model Extensions allow you to display in your Form Driven Flows fields other than the underlying entity's attributes.
In FintechOS you can extend a data model with four types of data extensions:
- Custom data extensions - Attributes that are not stored in the database and are not associated with any entity. They can, however, be populated based on existing entity attributes.
- Related data extensions - Attributes from a related lookup entity.
- One to one data extensions - Attributes from an entity which has a lookup referencing the current entity (the two entities are in a 1:1 relationship).
- Transient Data Entity - Entities that temporarily store and display data that has been loaded from or is going to be saved to an external data source. For more information, see Transient Data Entities.
When to use custom data extensions?
These data extensions give you full control of attributes’ values without altering the DB.
Use them to calculate and display aggregated attribute values in the user interface, without storing the actual values in the database.
You can render the following types of attributes: Bool, Date, Text, Lookup, Numeric, Text, Area, DateTime, OptionSet and Whole Number.
When to use related data extensions?
Use these attributes when you want to render data extensions which take the properties of real attributes. You will be able to edit the value of the data extension similar to editing real attributes.
Related data extensions allow you to define a data extension of the current entity to another entity from the DB which is related based on a lookup attribute.
For example, on entity ‘Contract’ there is a lookup attribute to the entity ‘Client’ and we want to extend the data model of the ‘Contract’ entity with attributes from the ‘Client’ entity so that on the same digital journey, when updating a contract, we will also be able to edit client data.
When to use One to One data extensions?
One to one data extensions enable modeling a base entity and all specialized entity extensions referencing it.
They allow you to define an entity extension of the current base entity (e.g., ‘Account’) to another entity (e.g., ‘Financial Info’) which has a lookup to the current entity (the two entities are in a 1:1 relationship). For an instance of entity ‘Account’ there is one instance of entity ‘Financial Info’ which refers to entity ‘Account’.
You can extend an entity with multiple specialized entities and have multiple digital journeys serving different purposes. The base entity will have multiple entries with different views based on the views used by the digital journeys defined on the entity.
For example, a base Account entity can be extended with Client Info and Suppliers entities and on the Account entity have two digital journeys: one for creating clients and one for creating Suppliers.
When to use Transient Data Entity extensions
Use transient data entity extensions to fetch data from an external source and display it in a form driven flow or to save data displayed it in a form driven flow to an external destination.
Specific to related data extensions
Data extensions have specific particularities when they are related to real attributes of type lookup and optionset. These particularities are described below.
Relating to real lookup attributes
If you render a data extension which is related to a real lookup attribute, the data extension will be a lookup attribute as well. You will be able to choose the same pool of records as the real attribute, or edit selected record.
Relating to real optionset attributes
If you render a data extension which is related to a real optionset attribute, the data extension will be an optionset attribute as well.
If the real attribute has a default selection, the related data extension will have it as well. If a new record is added to the option set, it becomes the default selection of the data extension. You can add options items to the data extension similar to the real attribute.
In order to extend a data model with data extensions, you need to add a business entity extension.
Adding Business Entity Extensions
If you want to extend your entity with both custom and related attributes, you need to add two distinct entity extensions, one of type custom and the other one of type related.
To add an entity extension, follow these steps:
- Go to the Edit Business Entity page of the entity you want to extend.
- Scroll-down to Extended Model section and click on the section header. The section expands.
- At the top side of the section, click the Insert button. The Add Business Entity Extension page appears.
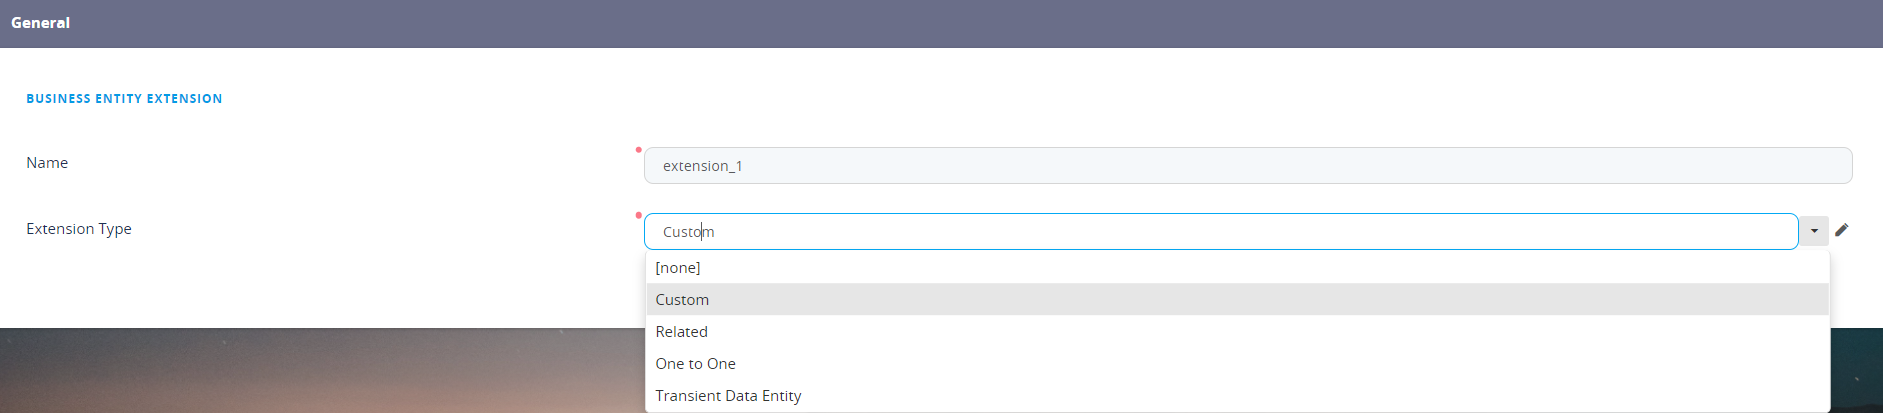
- In the Name field, provide an unique name for the entity extension.
- From the Extension Type drop-down, select the type of data extension(s) you extend the entity with (either custom, related, one to one or transient data entity).
- (For extensions of type Related): From the Relation Attribute drop-down, select the desired attribute from the list of lookup attributes existing on the entity. This will set the connection with the 'lookup entity' at 'Entity Extension' level making it easier to select which attribute of this entity will be used when adding related data extensions.
- For extensions of type One to One): From the One to One Relationship field, select the relationship between the current entity and the entity extension referencing it. For example, for base 'Account' entity, select the relationship between 'Account' and 'Client Info'.
- (Optional for extensions of type Related and One to One): Select the Is owner for relation checkbox so that when an entity instance is created, an entity connected through the Relation Attribute / One to One Relationship field will also be created to fulfill this logic.
- At the top-right corner of the page, click the Save and reload icon. The Virtual Attributes section is unlocked.
You can now start adding data extensions to this entity extension.
Adding Custom Virtual Attributes
Prerequisite: You need an entity extension with the Extension Type custom.
To add a custom data extension to an entity extension, follow these steps:
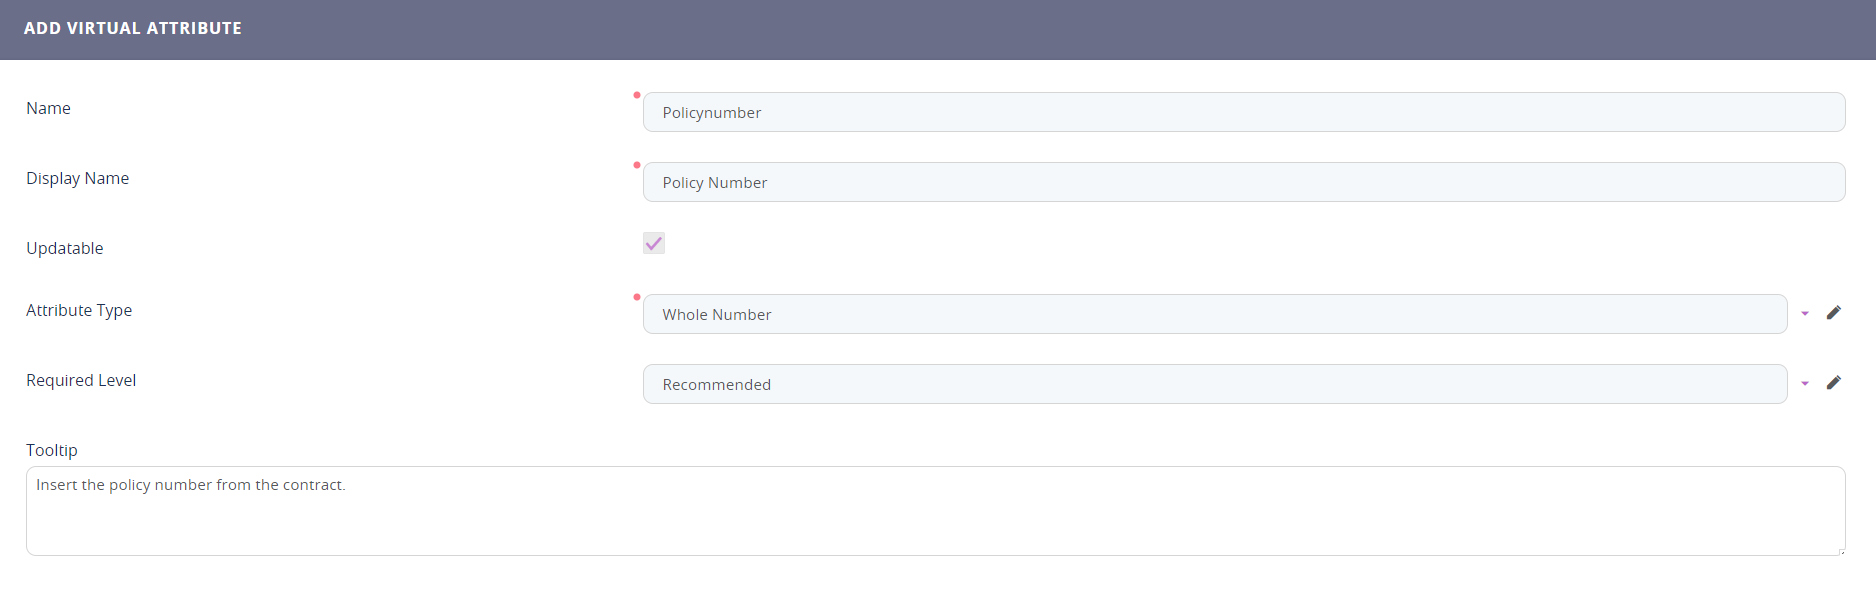
- At the top of the Virtual Attributes section, click the Insert button. The Add Virtual Attribute page appears.
- Provide the mandatory fields:
- none
- recommended
- required.
- At the top-right corner of the page, click the Save and reload icon. The Add Virtual Attribute page closes.
- Save the business entity updates.
| Property | Description |
|---|---|
| Name | The name of the data extension that will be used by the system. |
| Display Name | The name of the data extension that will be displayed in the user interface. |
| Attribute Type | Select the type of attribute. For more information on the types of attributes available in FintechOS Studio, see Attributes. |
|
Updatable |
For the data extension value to be updated automatically, select the Updatable checkbox. |
|
Required level |
Select one from the list: |
|
Tooltip |
If tooltips are set to be shown on forms and digital journeys and you want to have a tooltip explaining this data extension in the user interface, provide the desired text in the Tooltip text area field. Insert the tip to be displayed when hovering over the field. |
For details on how to render custom data extensions in the user interface, see Rendering Custom Data Extensions.
Adding Related Virtual Attributes
Prerequisite: You need an entity extension with the Extension Type related.
To add a related data extension to an entity extension, follow these steps:
- At the top of the Virtual Attributes section, click the Insert button. The Add Virtual Attribute page appears.
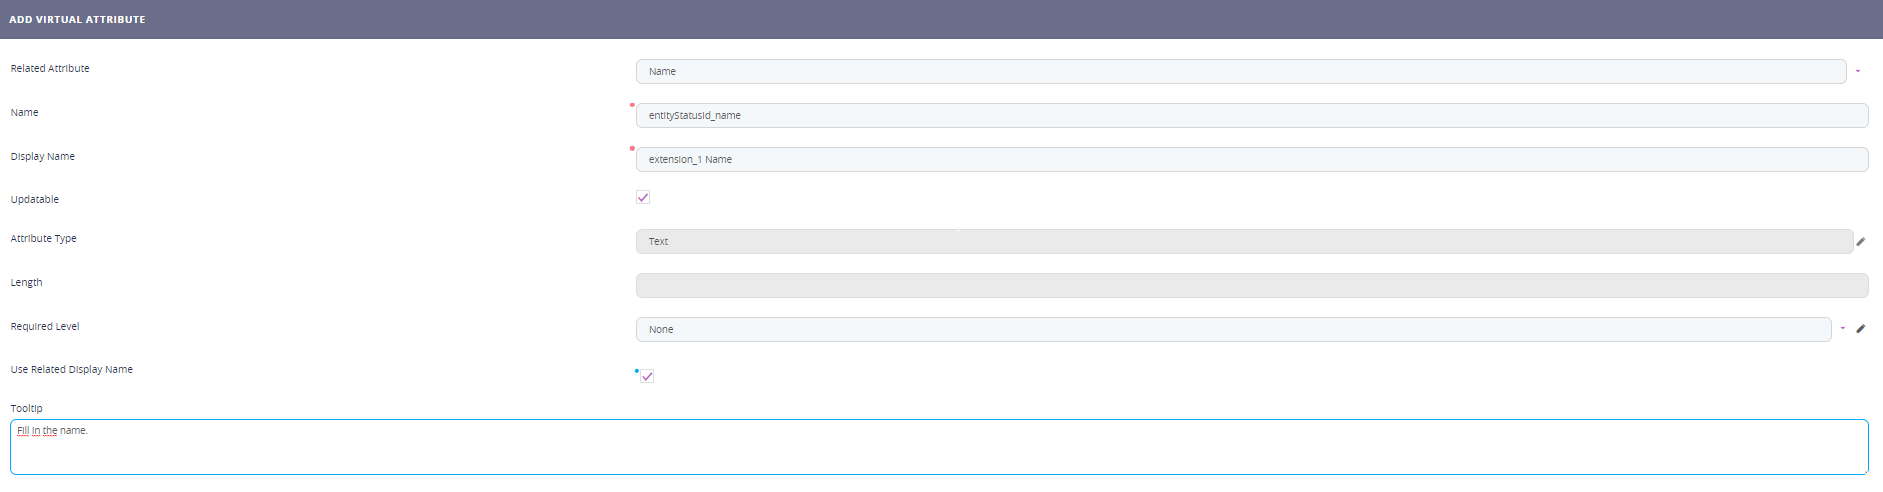
- From the Related Attribute field, select the desired attribute to which the data extension will be related to. You can choose from the list of lookup attributes existing on the entity to which you connected on entity extension level.
- Selecting the Related Attribute will automatically fill-in some of the fields with information from the related attribute.
To update the related entity instance attribute value when the current entity instance Virtual Attribute field is updated, select the Updatable checkbox. If tooltips are set to be shown on forms and digital journeys and you want to have a tooltip explaining this data extension in the user interface, provide the desired text in the Tooltip text area field.
- At the top-right corner of the page, click the Save and reload icon. The Add Virtual Attribute page closes.
- Save the business entity updates.
Once added to the data model, related virtual attributes become available in the UI designer (they will appear with a (VA) suffix added after their name).
Adding One to One Virtual Attributes
Prerequisite: You need an entity extension with the Extension Type One to One.
Adding data extensions to an One to One business entity extension is similar to adding Related data extensions.
Once you add all the data extension that you need, you can start using them by adding the entity extension on forms and digital journeys.